
Want to add text behind images online for free? Text Behind Picture (TBP) is a free online editor that lets you create eye-catching graphics where text appears to go behind your subject in seconds no Photoshop needed. Whether you're making YouTube thumbnails, Instagram posts, or TikTok covers, this guide shows you exactly how to put text behind photos using our free text behind image editor.
Designing visuals that capture attention is one of the most valuable skills for creators today. The way text interacts with your image can make all the difference. One of the most popular effects is placing text behind an object in a photo. Traditionally, this effect required professional software like Photoshop and a fair amount of skill with layer masking.
But with TextBehindPicture.com, you can create this professional text behind photo effect instantly, online, and completely free. It removes the complexity and makes the process beginner-friendly. Instead of brushes, selections, and hours of practice, you just upload, type, adjust, and download.
In this step-by-step tutorial, I'll guide you through the entire process. By the end, you'll know how to create professional text behind subject effects with no prior editing experience.
Text Behind Image: Quick Answers
Before we dive into the full tutorial, here are quick answers to the most common questions:
Q: Can I add text behind images for free?
A: Yes! Text Behind Picture is completely free to use online with no sign-up required. There are no watermarks, no download limits, and no hidden costs.
Q: How do I put text behind an image?
A: Upload your photo to TBP, add your text, and our AI automatically layers the text behind your subject. The entire process takes about 30 seconds.
Q: What's the difference between text behind and text in front?
A: Text behind creates a depth effect where your subject appears 3D and pops out from the design, while text in front sits flat on the image. The text behind effect is trending on platforms like YouTube and Instagram because it makes thumbnails and posts stand out.
Q: Can I use this on mobile?
A: Yes! TBP works on any device mobile, tablet, or desktop. The editor is optimized for touch screens, so you can create text behind photos right from your phone.
Why Choose TextBehindPicture.com?
Before we jump into the steps, let's answer an important question: why this tool?
- No downloads or signups – Everything works directly in your browser.
- Completely free – Unlike Photoshop ($55/month) or paid tools, there's no subscription.
- Beginner-friendly – The process is simplified so anyone can follow along.
- 30-second results – What takes 15 minutes in Photoshop takes 30 seconds here.
- Creative freedom – You can customize fonts, text styles, and even image brightness or contrast.
- Mobile-optimized – Works perfectly on phones and tablets, not just desktop.
Instead of spending hours learning complicated tools, you can focus on your creativity and get professional results instantly.
How to Add Text Behind Images Using TBP: Step-by-Step Guide
Step 1: Upload Your Photo or Image
Start by visiting TextBehindPicture.com and clicking the "Try Now" button on the homepage. This opens the free online editor your workspace where all the editing happens.
Once the editor loads, the first thing you need to do is upload the photo you want to edit.
- Click the Upload Image button
- Select an image from your computer or mobile device (JPG, PNG, HEIC formats supported)
- The tool will take a few seconds to load and optimize your image
Pro tip: Use high-resolution photos for best results. Images with a clear subject work better than busy backgrounds.
Mobile users: Tap the upload button and select from your photo library. The interface automatically adjusts for touch screens.
What makes this different: Unlike Photoshop, you don't need to manually cut out your subject or create complex layers. TBP's AI handles background detection automatically.
Step 2: Add Text to Your Image
After your image has loaded, look for the text input box.
- Type your desired text (for example, your title, slogan, or name)
- As soon as you type, the text will appear on your uploaded image
- The text is immediately editable and movable
This is the starting point. From here, you can position and style your text exactly how you want it.
Popular fonts for creators: Impact (bold YouTube style), Montserrat (clean modern), Bebas Neue (all-caps energy), Anton (attention-grabbing). Experiment to find what matches your brand.
Step 3: Position the Text Behind Your Subject
Now comes the interactive part.
- Click and drag your text box directly on the image
- Place it where you want the text to appear behind your subject
- The AI automatically detects where your subject is and layers the text accordingly
This step is flexible. You can experiment by moving the text around until it feels natural and visually balanced.
Mobile tip: Pinch to zoom for precise placement. This helps especially when working with smaller text or detailed positioning.
Step 4: Customize Your Text Properties
TextBehindPicture.com gives you plenty of options to customize how your text looks.
Here's what you can do:
- Capitalization – Switch between uppercase, lowercase, or styled case
- Bold – Add emphasis by making your text thicker and stronger
- Font style – Choose from a range of fonts to match your design mood (professional, fun, modern, or bold)
- Opacity – Make your text more transparent or solid, depending on how much you want it to stand out
- Rotation – Tilt the text slightly for a creative effect
- Font size – Use the slider to make the text bigger or smaller until it feels right
Each of these options is simple to control. You don't need design knowledge to experiment just try different combinations until your text blends seamlessly with the image.
Pro tip: Start with 70-80% opacity for a more natural depth effect. You can always increase it if the text isn't visible enough.
Step 5: Fine-Tune Image Properties (Optional)
Sometimes, the image itself needs a bit of adjustment to make the text behind photo effect really pop.
The editor includes options for this:
- Contrast – Increase or decrease contrast to make the subject and text more distinct
- Brightness – Lighten or darken the photo for a better visual balance
These are optional, but they often help make the final design look more polished and professional.
What makes this different: In Photoshop, you'd need separate adjustment layers and masks. Here, it's just two simple sliders.
Step 6: Download Your Text Behind Image
Once everything looks perfect, it's time to save your work.
- Press the Download button
- Choose your preferred format (JPG or PNG)
- The edited image is saved directly to your device
Free download: No watermarks, no sign-up required. Your text behind image is ready to use immediately.
Ready for: YouTube thumbnails, Instagram posts, TikTok covers, Pinterest pins, Facebook graphics, Twitter headers, and any other platform.
Text Behind Image vs. Traditional Methods
TBP vs. Photoshop
TextBehindPicture.com:
- Free, browser-based, no installation
- Automatic background removal with AI
- 30-second workflow from upload to download
- No learning curve works instantly
Adobe Photoshop:
- $55/month subscription
- Steep learning curve (15-20 hours to master layering)
- Manual subject masking required (pen tool takes 10-15 minutes per image)
- Requires powerful computer
Best for: Creators who need fast, professional results without design experience or monthly software costs.
TBP vs. Canva
TextBehindPicture.com:
- Specialized text-behind-subject effect with AI
- Automatic depth layering
- Free with no usage limits
- Built specifically for this effect
Canva:
- General design tool with templates
- Text behind requires manual layering and cropping
- Free tier has limited features
- Not optimized for text behind images
Best for: Anyone who wants the specific text behind photo effect without working through general design tools.
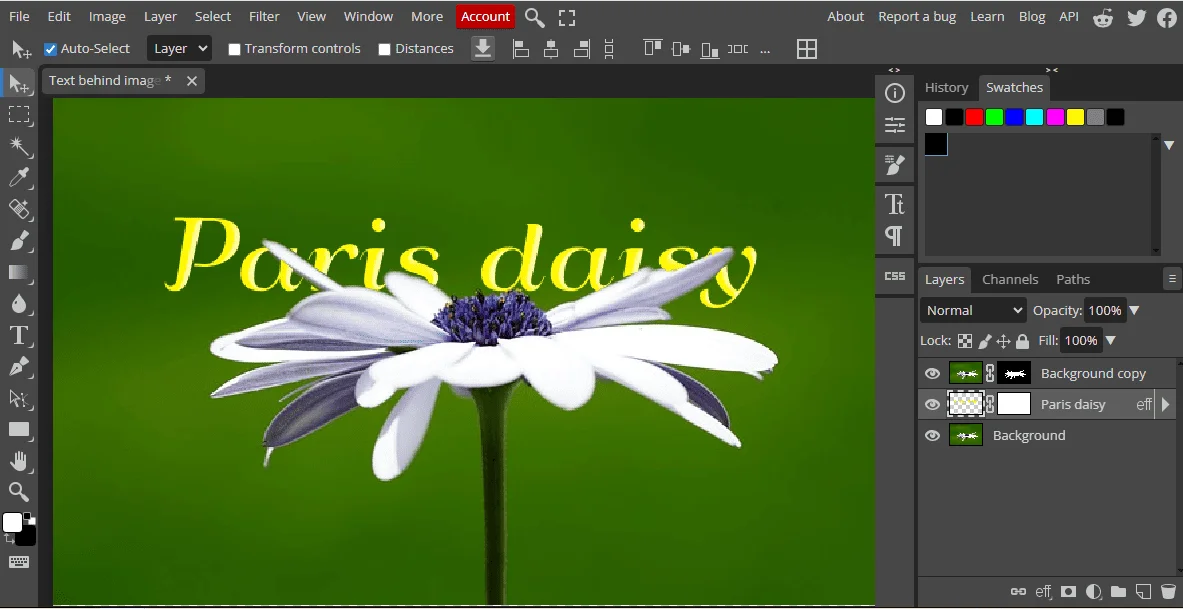
TBP vs. Manual Photoshop Layers
Creating text behind images in Photoshop manually requires:
- Subject Selection – Using the pen tool or quick selection (5-10 minutes)
- Layer Creation – Creating and organizing multiple layers (2-3 minutes)
- Text Placement – Adding text layer between background and subject (2-3 minutes)
- Masking – Fine-tuning layer masks for clean edges (5-10 minutes)
- Adjustments – Color correction, opacity, final touches (3-5 minutes)
Total time: 15-30 minutes per image for experienced users. Beginners can take hours.
With TBP: Same professional result in under 30 seconds, completely free online. No masking, no layer management, no complex tools.
When to Use Text Behind Images
YouTube Thumbnails
Make your video titles pop with depth and dimension. The text behind effect makes thumbnails stand out in suggested videos and search results. Viewers' eyes are drawn to the 3D layered look, which can increase click-through rates significantly.
Best for: Tutorial videos, vlogs, gaming content, educational channels.
Instagram & TikTok Posts
The trending visual style on social media. Adds professional polish to selfies, product photos, and lifestyle content. The depth effect makes your posts scroll-stopping in crowded feeds.
Perfect for: Quote graphics, announcements, personal branding, influencer content.
Pinterest Pins
Increased engagement with layered text effects. Makes pins more clickable and saves-worthy. The professional look signals quality content, which Pinterest's algorithm rewards.
Great for: Blog post graphics, recipe pins, DIY tutorials, fashion boards.
Marketing Materials
Stand out with professional designs for:
- Event flyers and posters
- Social media ads and promotions
- Product launches and announcements
- Real estate listings
- Restaurant menus and specials
- Local business advertising
The text behind image effect adds a modern, premium feel without expensive design costs.
Tips for Better Text Behind Photo Results
Here are a few extra pointers to take your designs to the next level:
- Use high-resolution images with a clear subject and clean background
- Keep your text short and bold so it remains legible (3-7 words works best)
- Experiment with opacity and contrast to create realistic depth
- Don't overcrowd the design leave some breathing space around text and subject
- Always preview your work before downloading to catch any issues
- Match font style to your brand bold fonts for energy, clean fonts for professionalism
- Consider your platform YouTube needs larger text than Instagram
- Test on mobile most people will view your content on phones
Real-World Success Stories
The text behind image effect isn't just trendy; it's proven to increase engagement. Here's where it makes a real impact:
Content Creators
YouTube creators report 15-30% higher click-through rates on thumbnails using the text behind effect. The depth makes thumbnails stand out in suggested video feeds.
Social Media Managers
Instagram accounts see increased saves and shares when using professional text behind photo graphics. The effect signals quality content, encouraging more engagement.
Small Businesses
Local businesses use text behind images for event promotions, seeing better response rates than standard flat text designs. The modern look builds trust and professionalism.
Educators
Teachers and course creators use the effect for course thumbnails and educational graphics, making learning materials more visually appealing and memorable.
Frequently Asked Questions
How long does it take to add text behind an image?
About 30 seconds from upload to download. Much faster than Photoshop's 15-30 minute manual process.
Can I use Text Behind Picture for commercial projects?
Yes! All images you create are yours to use however you want commercial or personal use.
What image formats are supported?
JPG, PNG, and HEIC formats. Most common image types work perfectly.
Is there a file size limit?
The tool works best with images under 10MB, but most photos from phones and cameras work fine.
Can I edit the same image multiple times?
Yes! Save your work and re-upload anytime to make changes or create variations.
Does the AI work with all types of photos?
The AI works best with clear subjects and defined edges. Busy backgrounds or unclear subjects may need manual adjustment.
Conclusion
You don't need Photoshop subscriptions, complex software, or hours of practice to put text behind images. With TextBehindPicture.com, the entire process is broken down into simple steps: upload your photo, add your text, customize the style, and download your professional text behind image in seconds.
It's completely free, works online from any device, and made for beginners and professionals alike. Whether you're creating YouTube thumbnails, Instagram graphics, TikTok covers, or business marketing materials, this free text behind image editor delivers professional results instantly.
The next time you're creating a thumbnail, poster, or social media graphic, remember you have a powerful free online tool at your fingertips. No downloads, no subscriptions, no complexity just professional text behind photo effects in seconds.
👉 Start creating now at TextBehindPicture.com and see how easy it is to add text behind images online free. Your next eye-catching design is just 30 seconds away.
Ready to Create?
Try Text Behind Picture today and join thousands of creators making professional graphics without Photoshop. Start with our free online editor and see the difference the text behind image effect can make for your content.
Read more
Easiest Tool to Put Text Behind Images Free
Why TextBehindPicture.com is the fastest, free way to put text behind objects. Compare it with Canva and Photopea with this in-depth analysis.
Put Text Behind Image in Photopea Free Online
Learn how to place text behind an object in Photopea, a free online alternative to Photoshop, with this detailed step-by-step guide for beginners.

How to Put Text Behind Images in Canva Free
Step-by-step guide to creating the text-behind-image effect in Canva, plus a head-to-head comparison with Text Behind Picture for creators who want faster results without a subscription.