
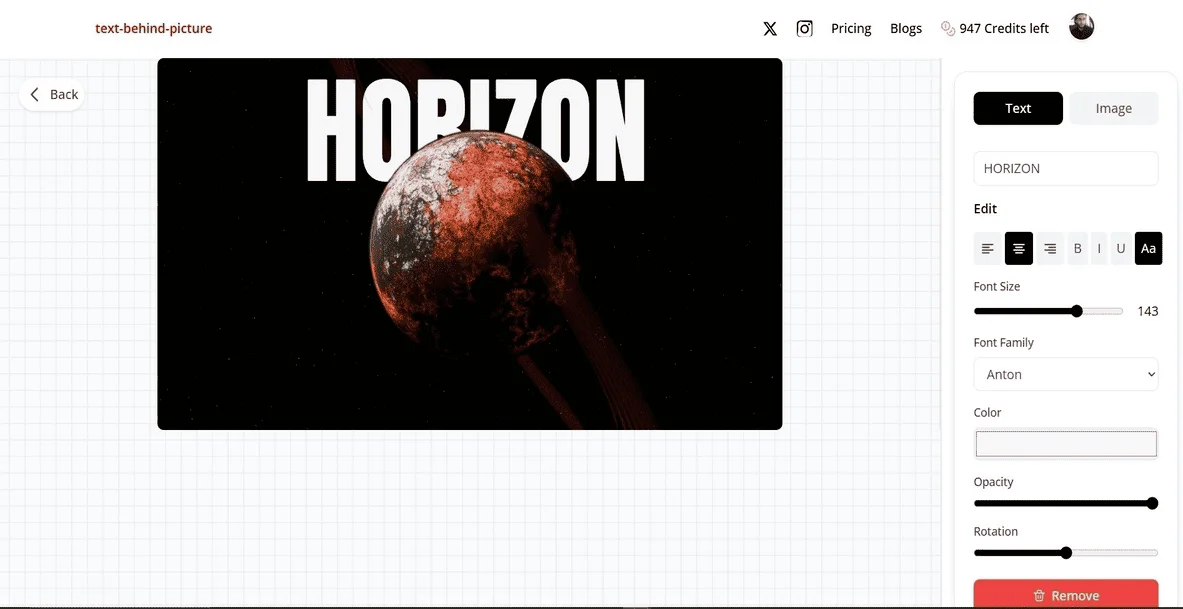
If you want to make your designs look more professional and creative, placing text behind an object in your image is a powerful effect. The good news? You don’t need Photoshop you can do it for free in Photopea, an online photo editing tool that works right in your browser.
Follow this beginner friendly step-by-step tutorial and you’ll be able to create stunning layered text effects in no time.
Step 1: Launch Photopea and Open Your Image
- Open Photopea in your browser.
- Go to File → Open and select the image you want to work with.
Step 2: Add Your Text
- Select the Text Tool (or press T on your keyboard).
- Click on the canvas and type the text you want to place behind your subject.
- Customize the font, size and color in the top menu bar.
Step 3: Arrange Layers
- In the Layers panel, ensure the text layer is above the image layer.
- This way, the text appears in front of the image before masking.
Step 4: Select the Object
Now, let’s define the object you want the text to appear behind.
- Use a selection tool:
- Quick Selection Tool → Click and drag over your subject.
- Pen Tool → Click anchor points around the subject, then right-click → Make Selection.
💡 Tip: Zoom in for a precise selection. The cleaner your selection, the better the final effect will look.
Step 5: Create Layer Masks
- With the object still selected, click on the image layer.
- Hit the Add Layer Mask button at the bottom of the Layers panel. This hides everything outside your selection.
- Next, click on the text layer and again hit the Add Layer Mask button.
Step 6: Hide Parts of the Text
- Press B to activate the Brush tool.
- Choose a soft round brush and set the foreground color to black.
- Paint over the text layer’s mask to hide the parts of the text that should go behind the object.
- Made a mistake? Switch the brush color to white and paint to reveal the text again.
Step 7: Refine Your Mask
- Zoom in on detailed areas where the text overlaps the subject.
- Adjust brush size and carefully paint to ensure clean, sharp edges.
Step 8: Final Adjustments and Saving
- Play with text effects like drop shadow or blending options to enhance the depth.
- Reposition or recolor the text if needed.
- Once done, go to File → Export As and save your image as JPEG or PNG.
Advanced Tips for Professional Results
Mastering Layer Mask Techniques
Once you're comfortable with basic masking, these advanced techniques will elevate your designs:
- Feather your masks – Use the Feather option on your layer mask for smooth, gradient-like transitions between text and subject. This prevents hard, unnatural edges.
- Use adjustment layers – Add brightness/contrast adjustment layers above your composition to fine-tune the overall mood without affecting individual elements.
- Blend modes – Experiment with Overlay, Soft Light, or Hard Light blend modes on your text layer to create glowing or embossed text effects.
- Multiple masks – Stack multiple text layers with different blend modes and opacities for complex, layered designs that stand out.
Choosing the Right Selection Tool
The quality of your effect depends on your selection accuracy:
- Quick Selection Tool – Fastest for simple, high-contrast subjects like people against plain backgrounds. Use with 80% accuracy tolerance for speed.
- Pen Tool – Most precise but time-intensive. Best for intricate details (hair, fabric textures). Each click creates an anchor point for pixel-perfect control.
- Select by Color – Ideal for subjects with uniformly colored backgrounds. Less effective for natural scenes.
- Refine Edge – After any selection, use this to automatically improve edges, especially useful for fuzzy hair or transparent elements.
Fixing Common Mistakes
- Halos around subject – Use feathering (2-5 pixels) and the Refine Edge tool to blend the selection boundary naturally.
- Text bleeding through unexpectedly – Check your layer order and mask direction. You may need to invert your mask (right-click mask → Invert).
- Rough edges after masking – Select the mask thumbnail in the Layers panel and apply a 0.5-1px Gaussian Blur for subtle smoothing.
Real-World Use Cases
YouTube Thumbnail Design
YouTube thumbnails are the most high-impact use case for the text-behind-image effect:
- Dimensions: 1280 × 720 px
- Best practices: Place your subject's face in the upper-center area, run bold 3-5 word text behind it, and leave the bottom 15% clear for YouTube UI overlap.
- Text placement: Angle text slightly (-5° to 5° rotation) for dynamic energy without looking unprofessional.
- Color psychology: Use high-contrast colors (white/black text on colorful backgrounds) to stop the scroll in YouTube's feed. Test at actual thumbnail size to ensure readability at 128×72px.
Instagram Posts & Reels Covers
Instagram's algorithm rewards visually distinctive posts. The text-behind-image effect signals intentionality:
- Dimensions: 1080 × 1080 px (posts), 1080 × 1920 px (Reels covers)
- Strategy: Use a single bold word or 2-3 word phrase as your text layer. Position the subject in the center and run text behind it horizontally.
- Brand consistency: Keep text color within your brand palette to build recognition. Photopea's color picker makes this easy—sample colors from your logo.
Twitter/X Post Graphics
Twitter's rapid-fire feed requires instant visual impact:
- Dimensions: 1200 × 675 px
- Optimization: Keep text to 1-4 words maximum. Use a font weight of 700+ (bold). Position subject right-aligned with text center-left for balance.
- Retweet potential: The depth effect is inherently shareable because it signals professional design—a social signal that can boost retweets.
Business Flyers & Posters
For print-ready designs, Photopea's export quality is critical:
- Resolution: Export at 300 DPI for print (1200 × 1800 px minimum for standard 8.5" × 11" flyers).
- CMYK vs RGB: Photopea exports in RGB by default. For professional printing, convert to CMYK to ensure accurate color representation. Use Image → Mode → CMYK before saving.
- Professional layouts: Place your CTA (call-to-action) in the bottom 20%, headers in the top 10%, leaving the middle 70% for the text-behind-image composition.
Platform-Specific Sizing Guide
| Platform | Dimensions | Recommended Text Length | Best Subject Placement |
|---|---|---|---|
| YouTube Thumbnail | 1280 × 720 px | 3-5 words | Upper-center (eyes at 1/3 line) |
| Instagram Post | 1080 × 1080 px | 1-3 words | Center |
| Instagram Reel Cover | 1080 × 1920 px | 2-4 words | Upper-center (top 50%) |
| Twitter/X | 1200 × 675 px | 1-4 words | Right-aligned |
| LinkedIn Banner | 1584 × 396 px | 3-5 words | Left 40% |
| TikTok Thumbnail | 1080 × 1920 px | 2-3 words | Center-top |
| Print Flyer (8.5×11") | 2400 × 3600 px @ 300 DPI | 4-6 words | Center or bottom-right |
Troubleshooting Common Photopea Issues
Image Won't Open
- Ensure the file is in a supported format (JPG, PNG, GIF, PSD).
- Try dragging and dropping the image directly onto the Photopea canvas instead of using File → Open.
- If Photopea is laggy, reduce image resolution before uploading (Photopea works best with images under 5MB).
Mask Changes Aren't Showing
- Make sure you're editing the mask and not the layer. The mask thumbnail (not the image thumbnail) should have a white border in the Layers panel.
- If changes have no effect, try clicking Image → Apply Mask and reapplying.
Text Doesn't Look Crisp
- Disable antialiasing on the text layer (right-click text layer → Rasterize Type) for pixel-perfect sharpness, or keep enabled for smoothness.
- Increase text size; smaller text appears blurrier after masking due to interpolation loss.
Exporting Quality Issues
- Use PNG format to preserve transparency; JPG compresses and can cause artifacts.
- Before exporting, flatten the image (Image → Flatten Image) for best results.
- Use File → Export As → set to 90-100 quality (JPEG) or 100% compression (PNG).
Photopea vs. Canva vs. TextBehindPicture: Feature Comparison
| Feature | Photopea | Canva | TextBehindPicture |
|---|---|---|---|
| Layer masking | Yes (full control) | Limited | N/A (AI-powered) |
| Free tier | Full-featured free | Limited features | Full-featured free |
| Background removal | Manual + AI assist | AI-powered | AI-powered only |
| Export formats | PSD, PNG, JPG, SVG | PNG, JPG, PDF, video | PNG, JPG |
| Learning curve | Medium (Photoshop-like) | Easy (templates) | Very easy (3 steps) |
| Professional control | High | Medium | Low (simplified for speed) |
| Best for | Designers, advanced users | Beginners, templates | Speed & simplicity |
| Collaboration | Limited | Strong (team features) | Solo only |
Choose Photopea if: You need professional-grade layer control, want to export PSD files for further editing, or work with complex compositions.
Choose Canva if: You want templates, team collaboration, or a broader design toolkit beyond the text-behind-image effect.
Choose TextBehindPicture if: You prioritize speed, have zero design experience, or want a dedicated tool for this specific effect.
Conclusion
You've now mastered the complete workflow for placing text behind images in Photopea, from basic layer masking to advanced techniques suited for professional projects. Whether you're creating YouTube thumbnails, Instagram posts, printed flyers, or branded social content, Photopea gives you the precision and control to execute your vision.
The investment in learning layer masks pays off long-term. Once you understand how masks work in Photopea, you'll recognize the same principles in Photoshop, GIMP, and other professional editors. This makes Photopea an excellent stepping stone for aspiring designers.
Start with simple designs—upload, mask once, export—then gradually experiment with blend modes, feathering, and multiple masks as you build confidence. With practice, you'll be creating layered text effects that rival professional design studios, all without leaving your browser.
Ready to get started? Open Photopea.com now and create your first text-behind-image design.
Read more

How to Put Text Behind Images in Canva Free
Step-by-step guide to creating the text-behind-image effect in Canva, plus a head-to-head comparison with Text Behind Picture for creators who want faster results without a subscription.
How to Add Text Behind Images Online Free (2026 Guide)
Create text behind images online for free with Text Behind Picture. No Photoshop needed! Our AI-powered editor automatically places text behind your photos in seconds. Perfect for YouTube thumbnails, Instagram, and TikTok.
Easiest Tool to Put Text Behind Images Free
Why TextBehindPicture.com is the fastest, free way to put text behind objects. Compare it with Canva and Photopea with this in-depth analysis.